.png)
Building a Custom Epoxy Resin and Wood Electric Guitar
- Jan 8
- 4 min read
Updated: Jan 14

This project was a custom Strat-style electric guitar made using mappa burl and epoxy resin. The goal was to let the timber’s natural character do most of the talking, with a smoky black resin section used to balance the shape and add contrast. Below is a full walkthrough of how the guitar was made, from sourcing the wood to the final finish.
Sourcing and preparing the timber

The body started as a large slab of mappa burl sourced from Surrey Timbers. I chose this particular piece for its strong figuring, movement, and natural voids — all features that work beautifully when paired with resin. The slab was dried to around 8% moisture content, making it suitable for instrument work.
Once in the workshop, the slab was cut down into manageable sections and inspected for cracks and soft areas. Any loose material was removed, and the surface was flattened using a router sled to create a level blank. Natural voids and imperfections were left in place to be filled later with resin rather than hidden.
Planning the design
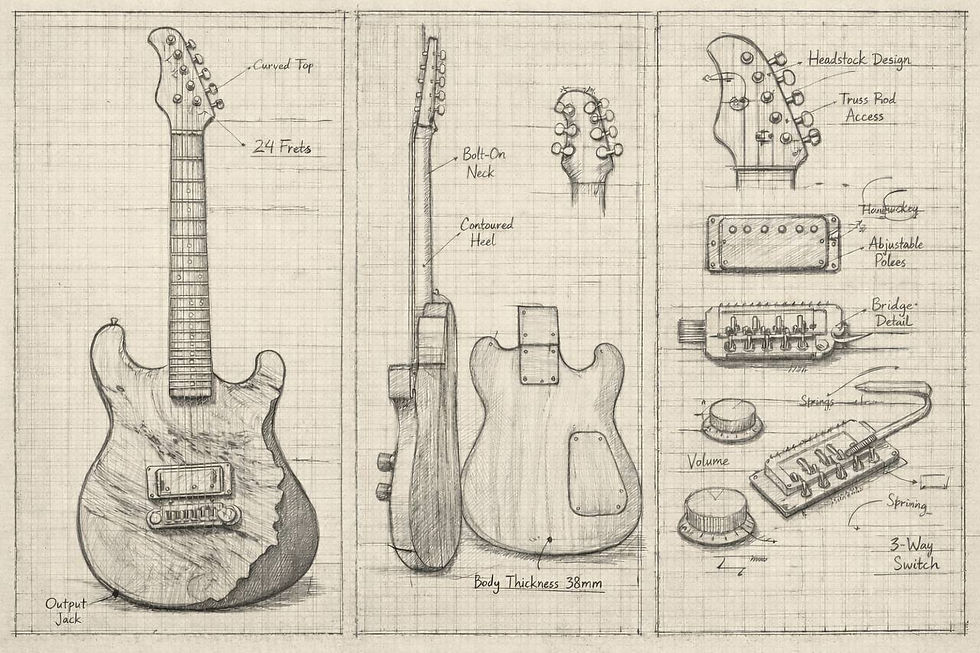
Before any resin work began, I discussed the design with the client and created some initial drawing plans. The guitar was planned as a Strat-style body with a standard bolt-on neck and a single pickup layout to keep things clean and simple. I suggested only having 1 pick up to reduce the need for a pickguard which would hide the natural wood.
Because the resin would form roughly one third of the body, the final outline wasn’t cut until after the pour had cured. This allowed the resin and timber to work together naturally rather than forcing a shape too early.
Sealing and resin pouring

To prepare the wood for resin, the entire surface was sealed with a thin coat of epoxy. This step is essential when working with burl, as it prevents air trapped in the grain from escaping during the pour and causing bubbles.
Once sealed, the body was placed into a custom mould. I used Epodex deep pour clear resin, adding black pigment to create the smoky effect on the right-hand side of the guitar. The resin was poured carefully to the required depth, ensuring it flowed naturally into the voids and along the live edge of the timber.
The pour was left to cure for seven days. During this time, the workshop temperature was kept stable to ensure an even cure and reduce the risk of cracking or surface issues.
Flattening and shaping the body
After the resin had fully cured, the blank was removed from the mould and flattened again using the router sled. This step revealed the final interaction between the mappa burl and the resin and allowed the figuring in the wood to really stand out.
An MDF guitar template was then fixed to the blank, and the body shape was cut using a router. Once the outline was complete, all internal cavities were routed, including the pickup cavity, control cavity, and neck pocket. Each cavity was measured carefully to ensure correct depth and alignment.
Hardware layout and routing

This guitar was designed with a single P90 humbucker pickup, keeping the electronics minimal and focused. A three-way switch and an oyster top volume control were used, giving the guitar a clean layout that suits the organic look of the body.
Pilot holes were drilled for the bridge, pickup mounting, controls, and output jack. All routing and drilling was done slowly to avoid chipping the resin or tearing out the burl grain.
Sanding and surface preparation
Sanding is one of the most time-consuming parts of a build, especially when working with both wood and resin. The timber sections were sanded progressively up to 360 grit, while the resin areas were taken up to 600 grit to remove scratches and refine the surface.
Extra care was taken along the join between wood and resin to ensure a smooth transition without visible steps or ridges. Any remaining pinholes or small imperfections were filled and sanded again before finishing.

Finishing and protection
The guitar body was finished using Rubio Mono-coat, which enhances the natural colour and depth of the mappa burl without creating a thick surface film. This finish allows the wood to retain a natural feel while still being well protected.
Once the oil had cured, a ceramic coating was applied over the entire body. This adds durability and resistance to wear while giving the resin a subtle sheen rather than a high-gloss finish.
Final assembly and setup
With the finish complete, the hardware was installed, including the bridge, pickup, controls, and output jack. The neck was fitted and aligned, and the guitar was wired and tested.
Strings were fitted, and a basic setup was carried out, including action, intonation, and truss rod adjustment. The result was a comfortable, playable instrument with a strong visual presence and a tone to match.

Final thoughts
This build is a good example of how epoxy resin and figured wood can work together without overpowering each other. By keeping the layout simple and letting the materials lead the design, the finished guitar feels balanced, individual, and genuinely one of a kind.
Every custom guitar I make follows a similar process but ends up completely different depending on the timber, resin, and client input. That’s what makes this kind of work so rewarding, no two pieces are ever the same.

If you’ve made it this far, thank you for sticking with me. If you’re interested in an electric guitar like this, feel free to get in touch for a quote or to discuss a custom project at burlstudio1@gmail.com
Comments